While setting up self-hosted analytics and error tracking (Umami and GlitchTip) on my NixOS server, I needed to protect login endpoints from brute-force attacks. The standard approach is straightforward: add nginx rate limiting.
The Simple Solution: Rate Limit Everything
So to protect your site’s login, a first step is something like this—a general zone that limits all requests:
limit_req_zone $binary_remote_addr zone=general:10m rate=30r/s;

location / {
    limit_req zone=general burst=20 nodelay;
    proxy_pass http://backend;
}
This works fine for general protection, however there is a balance. This setting is too strict for normal use (‘/’ means all pages and endpoints are subjected to this rate limit regime). So we need more (a lot) room for regular traffic but that means login pages are allowed to be called way more as well, we need stricter limits specifically for login endpoints. A brute-force attacker making for instance 30 requests per second can try 1,800 passwords per minute. That’s way too permissive.
So the next step was to create a stricter zone for /login:
limit_req_zone $binary_remote_addr zone=login:10m rate=5r/m;

location /login {
    limit_req zone=login burst=3 nodelay;
    proxy_pass http://backend;
}
Five requests per minute. That should stop brute-force attacks cold. Combined with fail2ban to block persistent offenders, this is a solid defense.
The Problem: You Just Broke the Login Page
Here’s what that strict rate limiting actually does:
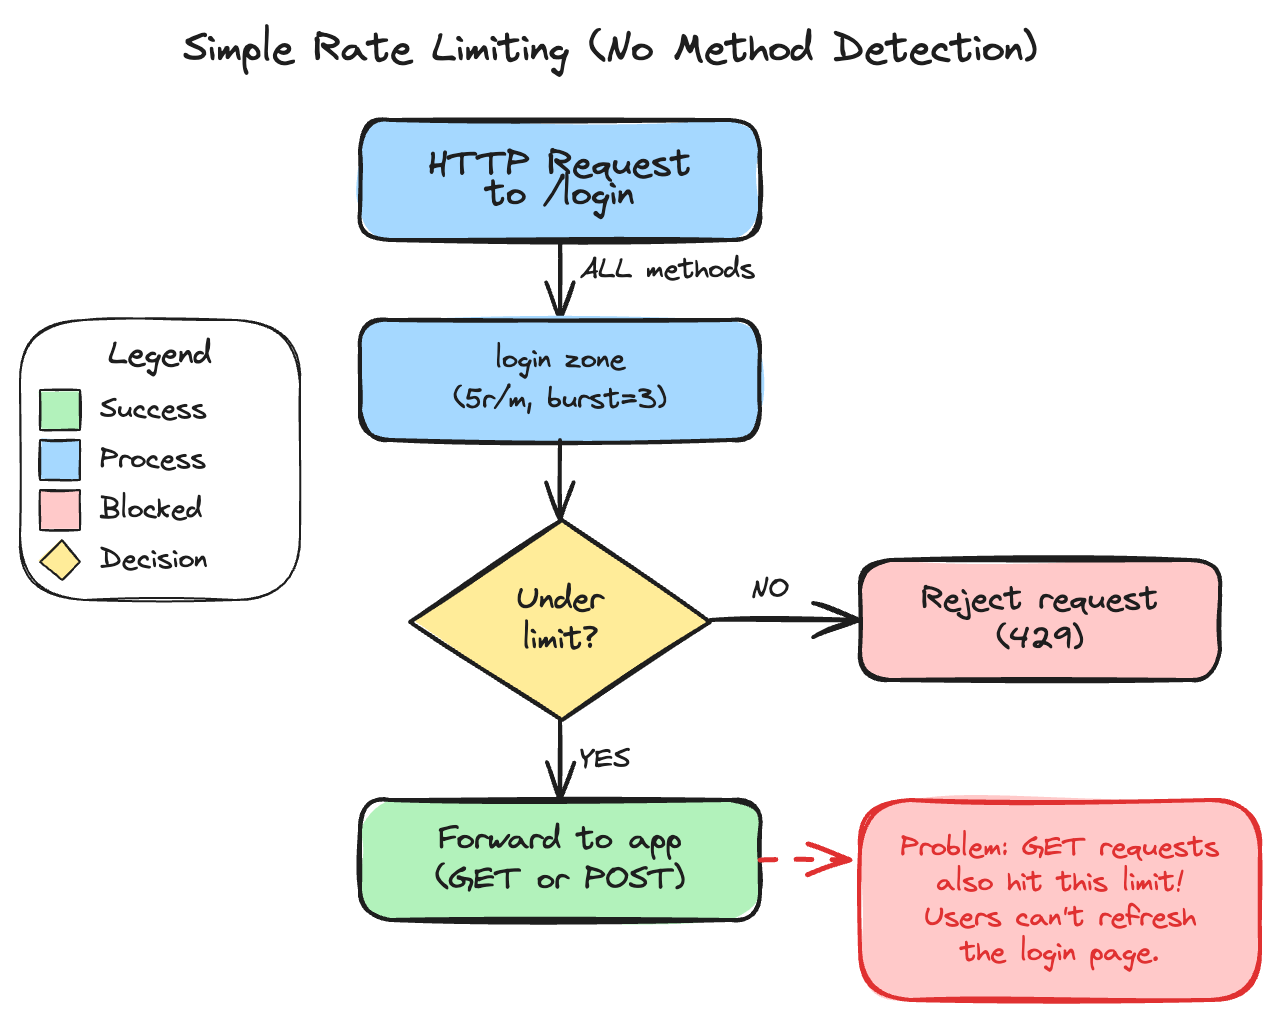
Every request to /login counts against the limit. User visits the login page? That’s one. Types wrong password and page reloads? That’s two. Hits refresh because the page looks stuck? Three, four, five—blocked.
Now your legitimate users are locked out of even seeing the login form. You’ve stopped brute-force attacks by making the login page unusable for everyone.
The Fix: Only Rate Limit What Matters
Login pages handle two distinct operations:
- GET - Display the login form (no credentials transmitted)
- POST - Submit credentials (the actual attack vector)
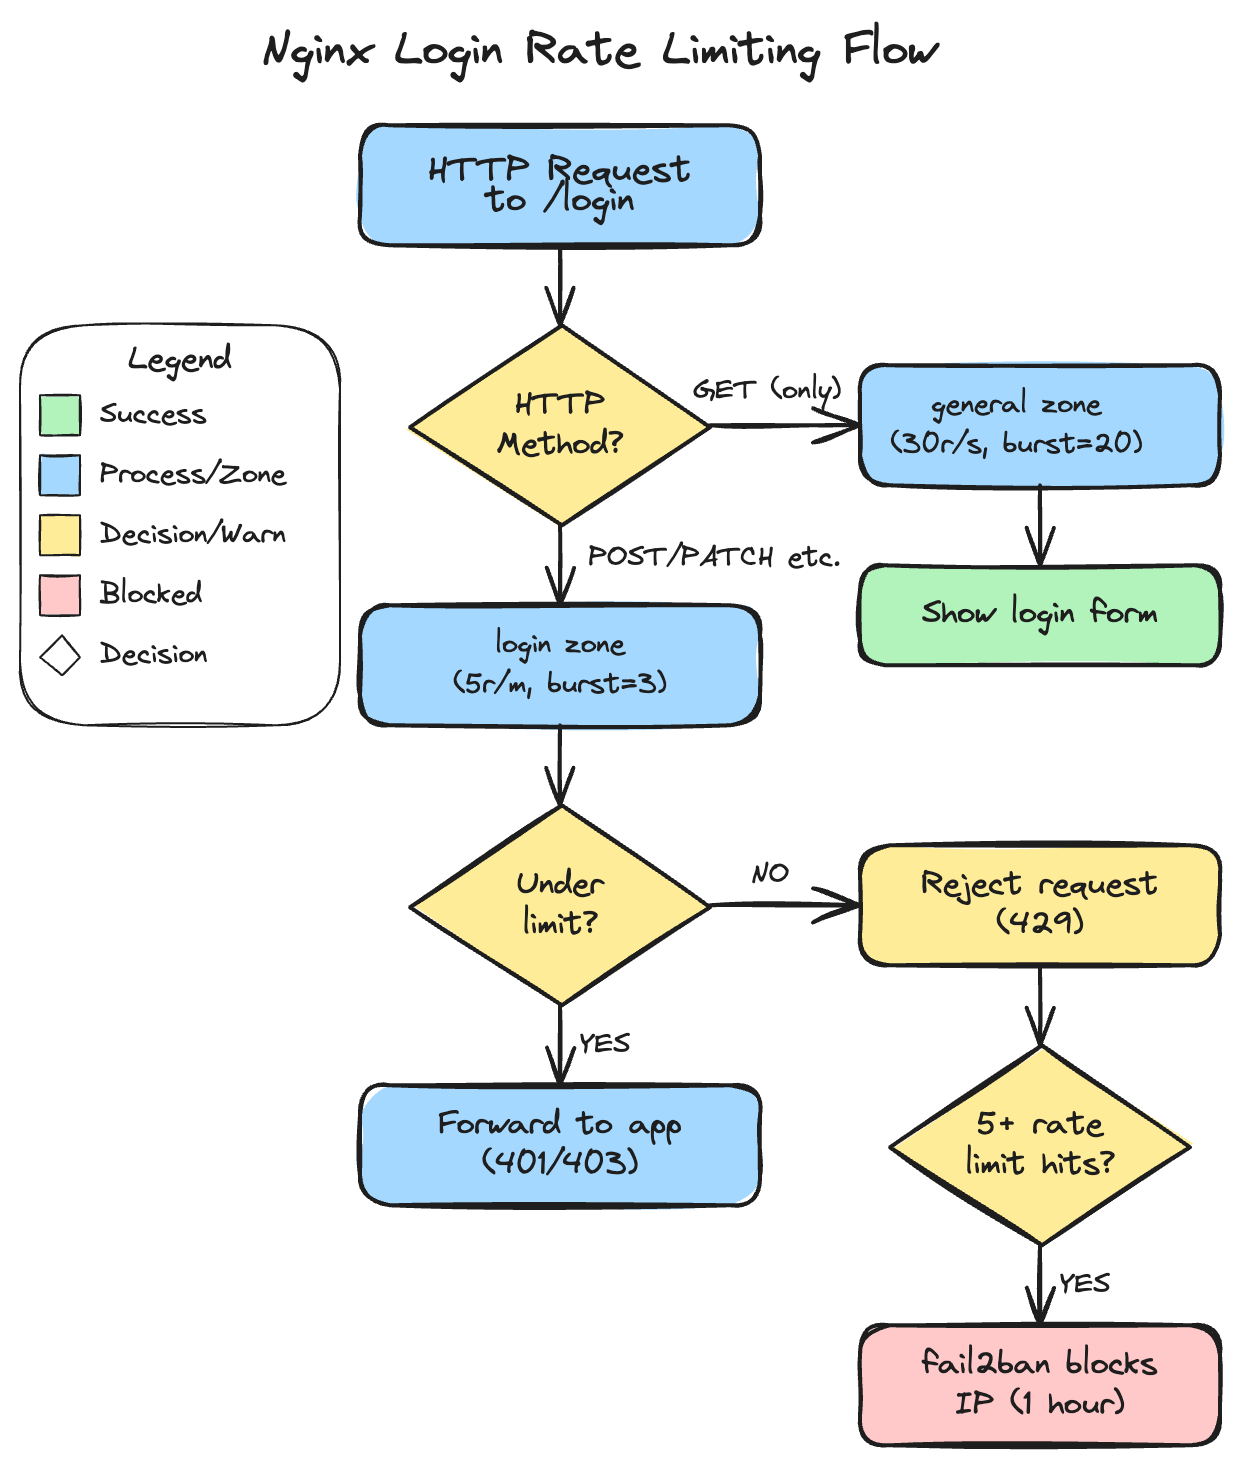
Attackers don’t care about loading the form—they’re hammering POST requests with credential combinations. GET requests are harmless. So why rate limit them at all? (Users should be able to refresh the login page as much as they want, within reason.)
The solution uses nginx’s map directive to create a conditional rate limit key:
map $request_method $login_limit_key {
    GET     "";                      # Empty key = no rate limit
    default $binary_remote_addr;     # Rate limit all other methods
}
limit_req_zone $login_limit_key zone=login:10m rate=5r/m;
When the key is empty, nginx skips rate limiting entirely. Users can refresh the login page as much as they want. But POST requests (and PUT/PATCH/DELETE for defense in depth) get limited to 5 per minute per IP.
Here’s the complete flow with HTTP method detection:
Why Not Just POST?
You could limit only POST requests specifically. But I prefer limiting all methods except GET—a “deny by default” approach that aligns with zero-trust security principles:
- Security-first: Block everything, then explicitly allow what’s safe (GET). If you forget to block a method, it’s already blocked
- Future-proofing: If your app adds alternative auth methods (PUT for API tokens, PATCH for password updates), they’re automatically protected
- Non-standard clients: Some HTTP clients behave unexpectedly
- Zero overhead: The performance difference is negligible
The worst case with POST-only limiting is an attacker using PUT instead—and slipping through. With “deny by default,” you’ve already blocked it.
The Full NixOS Configuration
Here’s my actual configuration running in production:
services.nginx = {
  appendHttpConfig = ''
    # Standard rate limiting zone for general API protection
    limit_req_zone $binary_remote_addr zone=api:10m rate=30r/s;
    limit_req_status 429;  # Return 429 instead of 503

    # Login endpoint rate limiting - all methods EXCEPT GET
    map $request_method $login_limit_key {
      GET     "";
      default $binary_remote_addr;
    }
    limit_req_zone $login_limit_key zone=login:10m rate=5r/m;
  '';

  virtualHosts."app.example.com" = {
    # Stricter rate limiting for login endpoint
    locations."/api/auth/login" = {
      proxyPass = "http://127.0.0.1:8080";
      extraConfig = ''
        # Nginx locations are mutually exclusive - this location won't inherit
        # rate limits from "/". We need both zones here.
        limit_req zone=login burst=3 nodelay;  # Strict for POST/PUT/PATCH/DELETE
        limit_req zone=api burst=20 nodelay;   # Standard limit for GET
        limit_conn conn_limit 5;
      '';
    };

    # General API rate limiting for all other endpoints
    locations."/" = {
      proxyPass = "http://127.0.0.1:8080";
      extraConfig = ''
        limit_req zone=api burst=100 nodelay;
        limit_conn conn_limit 50;
      '';
    };
  };
};
Watch Out: Location Mutual Exclusivity
Here’s something to keep in mind: nginx locations are mutually exclusive. When a request matches /login, it does NOT inherit rate limits from the / location. If you have a general rate limit on / and expect it to apply to /login too, that is not how it works.
From the nginx documentation: once a location is selected, only that location’s directives apply. This means login endpoints need their own complete rate limiting configuration—both the strict login zone AND any general API rate limiting you want.
The key settings:
| Setting | Value | Why |
|---|---|---|
rate=5r/m |
5 requests/minute | Strict but allows retries for typos |
burst=3 |
3 extra requests | Buffer for legitimate quick retries |
nodelay |
Immediate rejection | Don’t queue—fail fast |
limit_req_status 429 |
HTTP 429 | Proper “Too Many Requests” response |
The nodelay option is important. Without it, nginx queues excess requests and processes them at the rate limit. With nodelay, requests beyond the burst are immediately rejected. For login endpoints, you want fast feedback—don’t make attackers wait.
Finding the Right Endpoint
Do make sure you are limiting the correct endpoint, so avoid rate limiting /login when the actual authentication happens at /api/auth/login.
Different applications use different endpoints:
| Application | Actual Login Endpoint |
|---|---|
| Umami | /api/auth/login |
| GlitchTip | /login |
| Django (allauth) | /accounts/login/ |
| FastAPI (typical) | /api/auth/login or /login |
So test if you have the right endpoint.
Layered Defense with fail2ban
Rate limiting is your first line of defense. But what about persistent attackers who keep trying after hitting the limit?
Enter fail2ban. It monitors nginx’s error log for rate limit violations and bans repeat offenders at the firewall level:
services.fail2ban.jails.nginx-limit-req = ''
  enabled = true
  port = http,https
  backend = systemd
  journalmatch = _SYSTEMD_UNIT=nginx.service + _COMM=nginx
  maxretry = 5
  bantime = 1h
'';
The escalation path:
- First few violations → nginx returns 429
- 5+ violations → fail2ban blocks the IP entirely for an hour
This prevents attackers from even consuming nginx resources after repeated attempts.
The WebSocket Exception
One gotcha: some applications use WebSocket for authentication. Uptime Kuma, for example, uses Socket.io for its login flow. nginx HTTP rate limiting can’t protect WebSocket connections.
For these cases:
- Enable 2FA (essential—this is your primary protection)
- Use connection limiting (
limit_conn conn_limit 5) - Strong, unique passwords
- fail2ban if the application logs failed attempts
Testing Your Setup
Before congratulating yourself, verify it actually works:
# Should see 401/403 for first ~4 requests, then 429
for i in {1..8}; do
  code=$(curl -s -o /dev/null -w "%{http_code}" -X POST \
    https://app.example.com/api/auth/login \
    -H "Content-Type: application/json" \
    -d '{"username":"test","password":"test"}')
  echo "Request $i: HTTP $code"
done
Expected output:
Request 1: HTTP 401
Request 2: HTTP 401
Request 3: HTTP 401
Request 4: HTTP 401
Request 5: HTTP 429
Request 6: HTTP 429
...
And verify GET isn’t affected:
# Should never see 429
for i in {1..10}; do
  code=$(curl -s -o /dev/null -w "%{http_code}" -X GET https://app.example.com/login)
  echo "GET $i: HTTP $code"
done
When Not to Use This
This pattern works well for traditional form-based login, but consider alternatives for:
- Shared IP environments: This setup limits by IP address. If many users share the same IP (corporate networks, universities, mobile carriers with CGNAT), one user’s failed attempts can lock out everyone. For public-facing apps with diverse users, consider rate limiting by username instead, or use a combination of both.
- API token authentication: Rate limit the token generation endpoint, but tokens themselves should be validated per-request without rate limiting
- OAuth flows: The redirect dance makes simple rate limiting tricky—consider rate limiting the callback URL instead
- High-traffic public APIs: You’ll need more sophisticated rate limiting (by user, by endpoint, tiered limits)
For self-hosted applications where you control the user base, IP-based limiting works well. For public apps with users behind corporate firewalls or mobile networks, you’ll want something smarter.
The Result
My Umami analytics and GlitchTip error tracking now have proper brute-force protection. Legitimate users can refresh the login page freely. Attackers get rate limited after 5 attempts, and blocked entirely after persistent abuse.
Total configuration: about 20 lines of NixOS config. Time to implement: 30 minutes.
Resources
- nginx Rate Limiting - Official NGINX blog with detailed examples
- ngx_http_limit_req_module - Official module documentation
- fail2ban nginx-limit-req filter - Built-in filter for nginx rate limit violations
- nginx map directive - For conditional rate limiting
- Umami - Privacy-focused, self-hosted web analytics
- GlitchTip - Open-source error tracking and uptime monitoring
How do you handle login rate limiting? Found edge cases I didn’t cover? I’d love to hear about it—get in touch.